Tag Archives: tasty

Sunday Cook Off : Homemade Pizza With Pancetta and Grilled Vegetables

Inordinately proud

Inordinately proud

This week I decided to put to use the breadmaker that has been sat in my cupboard collecting dust ever since I inherited it from my mother’s clean out. So, baby steps, I decided to make some pizza dough – not too time consuming or complicated, not to mention incredibly tasty.

I know there are recipes out there for making your own pizza dough by hand, but I’ve yet to try any so I won’t recommend a specific one. I’m sure that Google can help you there.

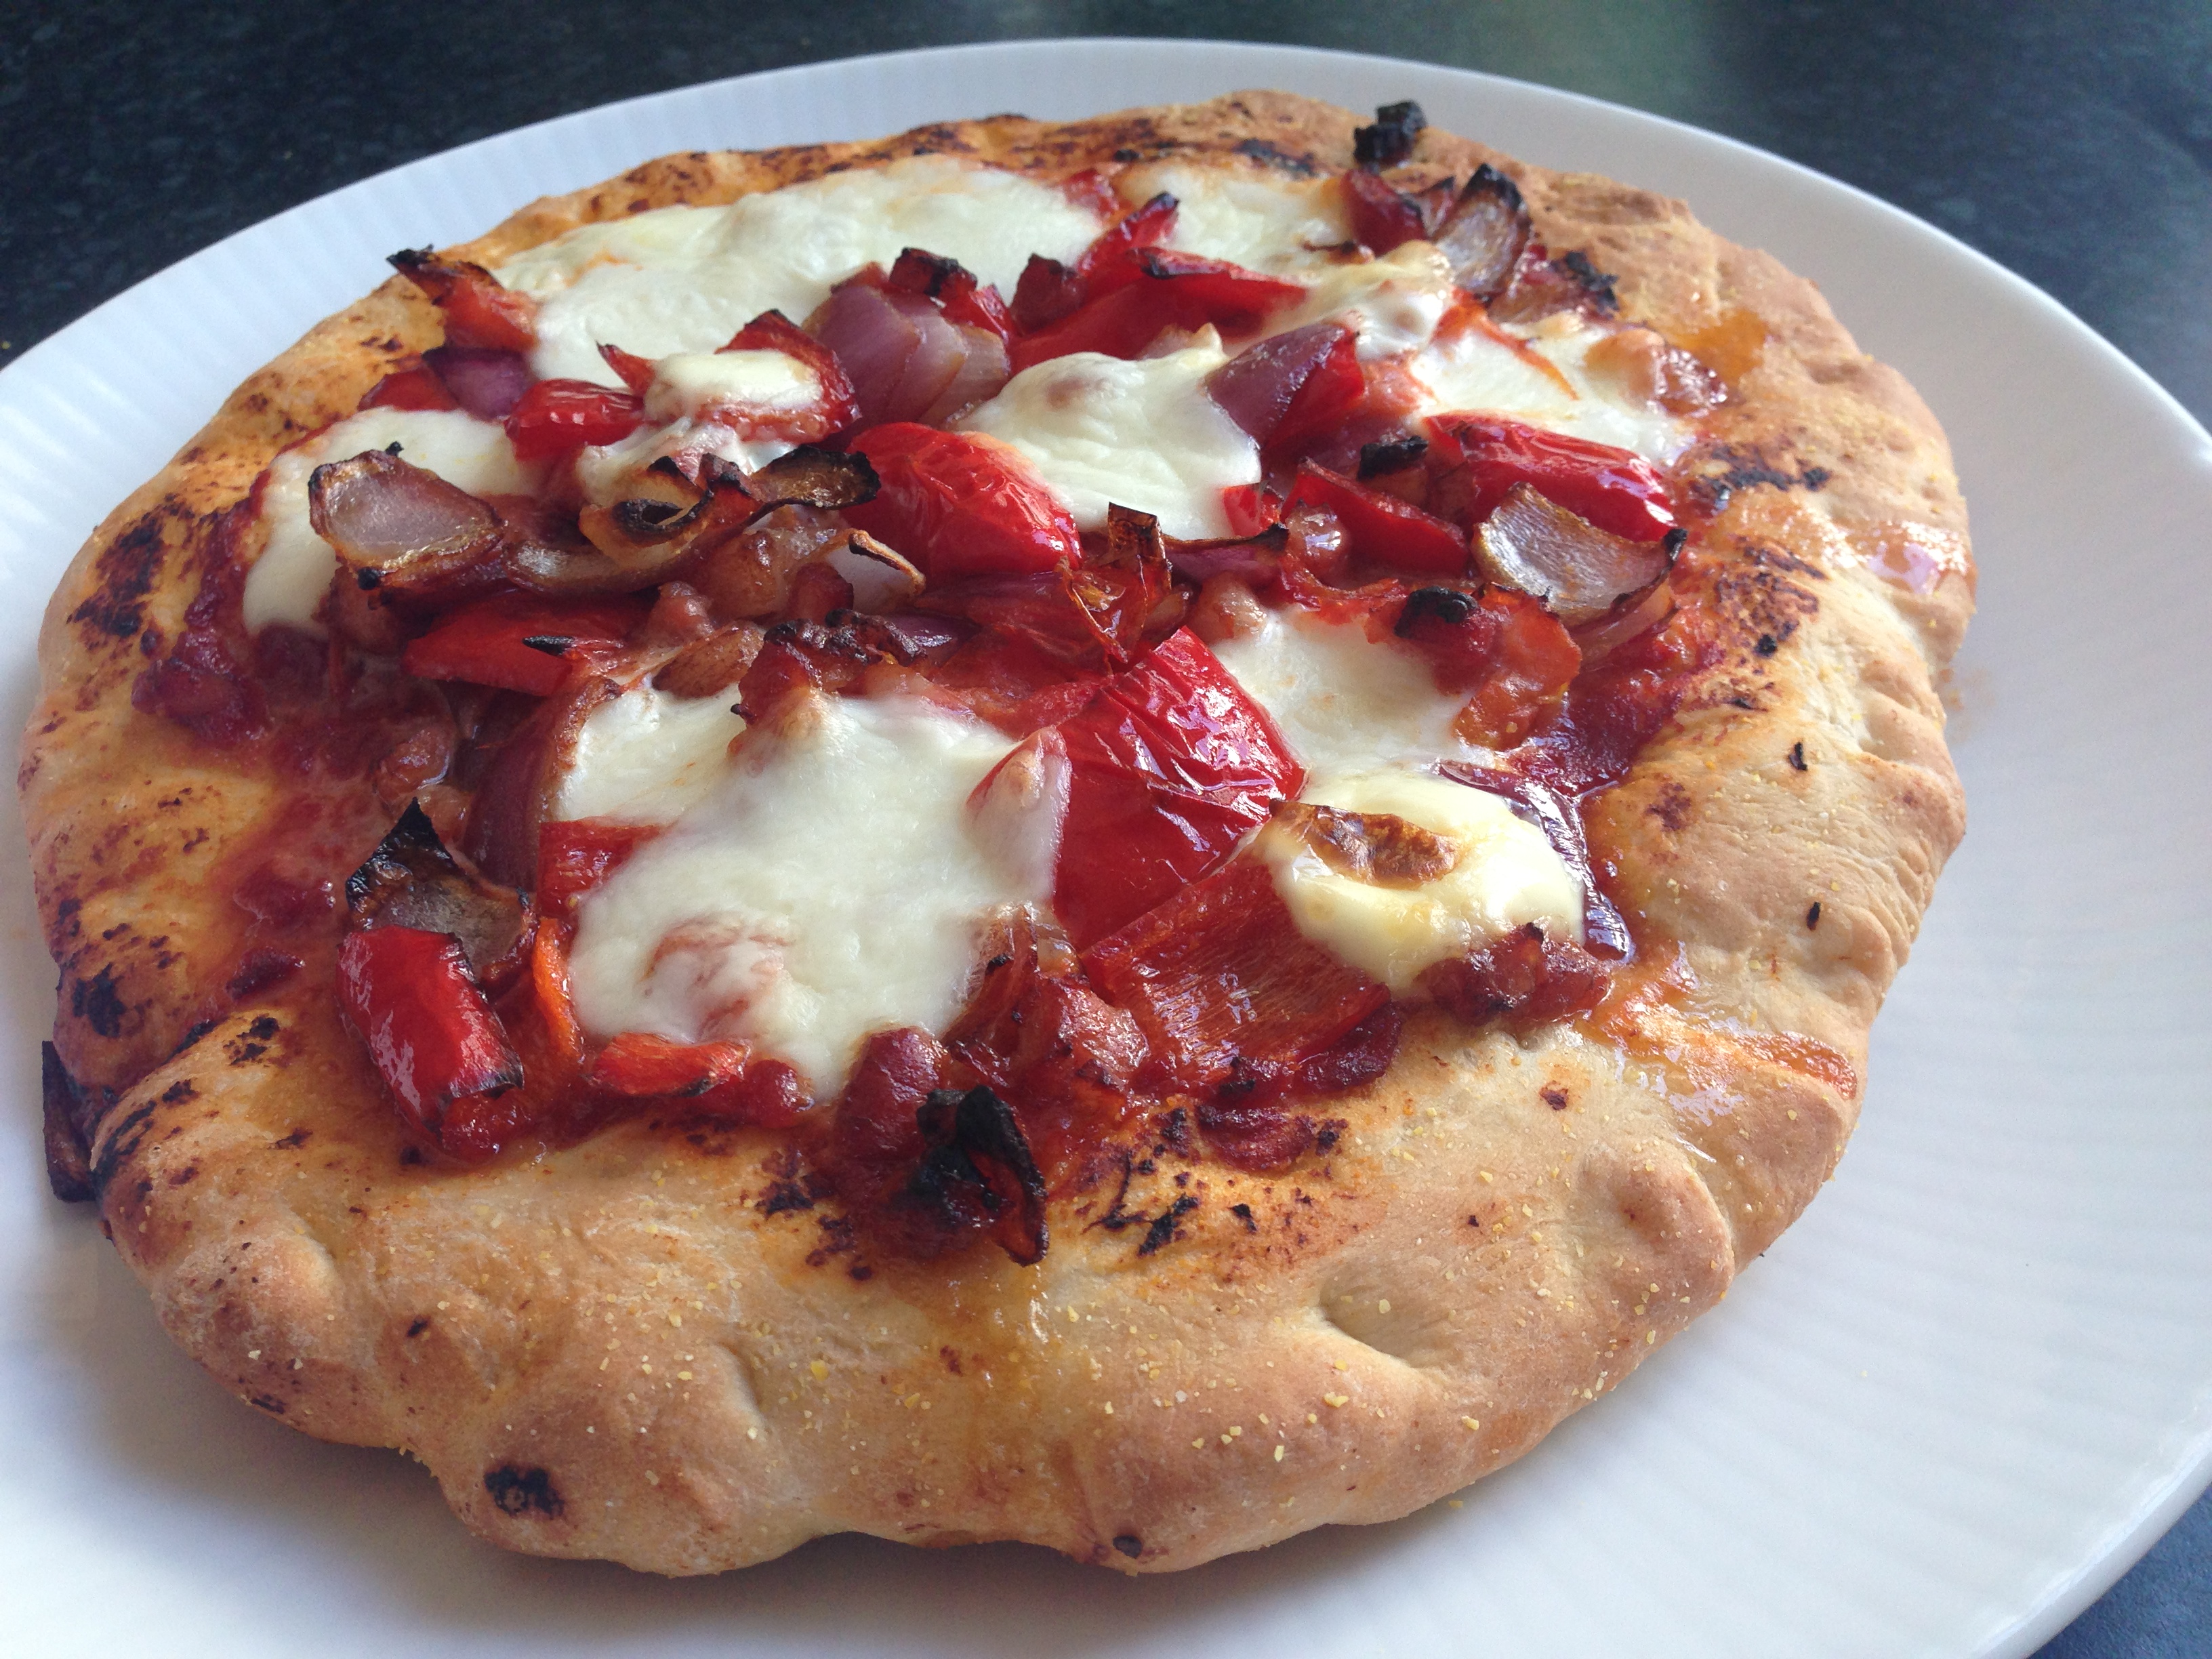
As a complete novice I wasn’t exactly sure of the procedure of how to manage the dough once it’s ready, other than what I’ve seen on ‘I Love Lucy’. So I squidged the dough out into a roughly circular shape to the size that I wanted my pizza to be, and then pinched in the edges to create a bit of a crust. In hindsight, I could have squidged a lot more and still would have been left with a (much larger) deep dish but hey, that’s what experimentation is for! One tip I did make use of was adding polenta instead of flour to shape my dough to give it the gritty kind of texture that I love in the classic takeaway.

For the toppings I spread some tomato puree over the dough and add some grilled up pancetta and mixed vegetables – namely red onion, sweet pepper and tomatoes – then added in a quite frankly excessive amount of mozzarella and mascarpone. It’s a weakness. I’m getting help.

Then I put it onto a flat baking tray and left it in an oven preheated to about 180* for around 15 minutes. Each oven is different and everyone prefers their pizza to taste a certain way, so just keep checking on it until you think it’s ready and then tuck in.


This week’s cook off wasn’t particularly scientific or accurate, but boy was it successful (and tasty!), so why not try a bit of experimentation once in while? Life is so much more exciting that way.

Advertisement
Tagged , , , , , , , , , , , , ,

Sunday Cook Off : Chocolate Covered Hokey Pokey

Homemade crunchies


This week I decided to try something a bit easier, and then proceeded to choose one of the more difficult things I could make: Hokey Pokey, or Cinder Toffee as it is sometimes known. It’s basically a homemade Crunchie bar. It sounds like an easy enough recipe, just sugar, golden syrup and bicarbonate soda, but the difficulty comes in knowing the best time to mix it all together. When you boil the golden syrup and sugar, you need to wait for as long as possible before adding the bicarb (without letting it burn), or you’ll end up with the kind of sticky mess that is sure to mess with dentistry. I covered it in chocolate to hide the slightly bitter aftertaste that comes with the bicarb, plus anything covered in chocolate is pretty good.

Recipe

2 tbsp caster sugar

4 tbsp golden syrup

2 tsp bicarbonate soda

1. Put the golden syrup and sugar in a saucepan and bring to the boil on a medium heat, stirring constantly.

2. Once the mixture has begun to boil, turn the heat down to low and leave it for up to 7 mins. Only stir once or twice so that it retains heat. Keep a constant eye on the mixture as it can burn quickly if left.

3. Check the mixture by putting a drop in a glass of cold water, if it is sticky then leave it for a while longer. You want it to be hard and brittle.

4. When the mixture is ready, remove from the heat and immediately add the bicarb then stir until combined (this should be very quick)

5. Once the mixture has foamed up and the bicarb is mixed in, immediately transfer to a greased baking tray (I tend to just put a sheet of baking paper in as opposed to greasing – less washing up). Spread the mixture out a bit, but be careful not to flatten it too much or it will lose all of the air bubbles.

6. Leave it for 15 minutes.

7. Then either cut it up with a knife or just break it apart with your fingers, keep the pieces a decent size to aid the chocolate dipping.

8. Break the chocolate into pieces into a bowl then place it over boiling water in a saucepan and stir until melted.

9. Once the chocolate is melted, remove the bowl and saucepan from the heat. Take each piece of hokey pokey and dip into the melted chocolate ensuring that it is fully covered – you can use tongs or your fingers, whichever suits.

10. Place the dipped pieces onto a sheet of baking paper and allow to cool. If you are in a rush you can stick it in the freezer for 30 minutes.

11. Once the chocolate has hardened, enjoy!


[Image via http://www.petitepigchocolates.com] I didn’t have time to photograph mine before my colleagues devoured everything!

Tagged , , , , , , , , , , , , ,

Sunday Cook Off : Croissants = All of the Pay Off and None of the Work

This week I felt like experimenting with puff pastry, and luckily we live in a world where I don’t have to make the stuff from scratch. I chose to use chocolate (successful) and marshmallows (disappeared into a caramel goo) as my fillings, but I might try cinnamon or fruit next time.

Basically the (extremely easy) method is this:

1. Buy pre-rolled puff pastry

2. Make sure to take it out of the fridge 10-15 minutes before you want to use it, otherwise it’ll crack

3. Unroll pastry sheet

4. Cut the sheet into the desired amount of sections (depending on how big you want your treats to be), I would say 8-12 pieces is about right if you’re making mini things.

5. Place your filling, in my case 1 square of chocolate and/or a few mini marshmallows, in the centre of the pastry square or triangle and fold it together

6. Ensure that the edges are firmly pressed and facing down on the baking sheet

7. Brush egg white and sprinkle some caster sugar on all of the croissants

8. Bake at 180 for up to 10 minutes, depending on your oven. Mine is basically a nuclear reactor so it was done in 8. Once they’ve turned golden brown, they’re done.

9. Best to let it cool a bit before eating, I learnt the hard way via some molten chocolate filling. I also found that the chocolate went quite hard once the pastries had cooled, but they can easily be reheated in the microwave so all is well that ends well.

10. Enjoy!


20130408-024824.jpg

Tagged , , , , , , , , ,

Sunday Cook Off : Oreos

In my current job I have taken to baking something for my colleagues every week, I get to try out new recipes and they get to stuff their faces with sugary goodness. I’ve done this at pretty much every job I’ve ever had, and needless to say it’s always gone down pretty well.

This week I went back to an old favourite, Oreos. The genius behind My Kitchen Addiction has perfected the filling so that it has just the right consistency that reminds you of the real thing.

I would recommend UK guys buy some cup measurements, as a committed internet baker I’ve found them incredibly useful! Still have no idea about ‘sticks’ of butter though.

Find the recipe here, or below: http://www.mykitchenaddiction.com/2012/02/homemade-oreos/

(Makes approximately 3 dozen)

For the cookies:

  • 230g unsalted butter, softened
  • 1 cup granulated sugar
  • 1 egg
  • 1 teaspoon pure vanilla extract
  • 2 cups all purpose flour
  • 3/4 cup dutch process cocoa powder
  • 1 1/2 teaspoons baking powder
  • 1 teaspoon salt

For the filling:

  • 120g unsalted butter, softened
  • 2 tablespoons double cream
  • 1 teaspoon pure vanilla extract
  • Pinch of salt
  • 3 – 3 1/2 cups powdered sugar, whisked to remove any lumps

Combine the butter and sugar in a large mixing bowl, and beat on medium speed until light and fluffy. Add the egg and vanilla, and beat until well incorporated.

Whisk together the flour, cocoa, baking powder, and salt. Gradually add the dry mixture to the creamed mixture, beating on the lowest speed. Continue to mix on the lowest setting until the dry ingredients are just incorporated.

Divide the dough in half, and shape into two discs. Wrap in plastic wrap and refrigerate for 1 hour.

When the dough is chilled, preheat the oven to 180°F. Line a baking sheet with parchment paper or a baking mat. Set aside.

Taking only one portion of dough out of the refrigerator at a time, turn the dough out onto a lightly floured surface. Roll the dough to 1/8 – 1/4-inch thickness. Use a cookie cutter (approximately 2 inches in diameter) to cut out cookies and transfer them to the prepared baking sheet.

Bake the cookies for 10-12 minutes, then transfer to a wire rack to cool completely. I baked mine for about 8 minutes but my oven is mental, and it depends on whether you prefer your cookies soft or crunchy.

Once the cookies are cooled, prepare the filling. Combine the softened butter, double cream, vanilla, and salt and beat until combined. The mixture may be a bit lumpy, but will come together. Add the powdered sugar gradually, approximately 1/2 cup at a time, until the filling comes together. It will be slightly stiffer than a cupcake frosting.

Transfer the filling to a piping bag fitted with a large round tip. Pipe the filling onto half of the cookies, and top with the remaining cookies to form cookie sandwiches.

20130401-023822.jpg

Enjoy!

Tagged , , , , , , , , ,

Sunday Cook Off: Ferrero Rocher Torte

This week’s Sunday Cook Off is slightly different, as I haven’t actually made the recipe below yet. But it is the closest approximation that I can find to a heavenly dessert that I tried this week, it’s a bit complicated but hopefully delicious in the end. This slice of amazingness is a Waitrose own brand concoction that I happened upon when faced with an array of unappealing fruity desserts. In my book, if it’s not chocolate, it’s not dessert.

The inspiration for this week can be found here (and wait until it’s on offer like I did, because no supermarket should charge £10 for a mass-produced cake, no matter how good it is): http://www.waitrose.com/shop/ProductView-10317-10001-154693-Waitrose+S%2Fchoc+chocolate+%26+hazelnut+tort

If you fancy making your own, and I will be once I’ve finished chomping my way through the one above, then look below for the recipe, or go here: http://www.fabulousfoods.com/articles/952429/chocolate-hazelnut-torte-recipe

Ingredients:

Cake:

1 cup caster sugar

3/4 cup plus 2 tablespoons plain flour

1/4 cup plus 2 tablespoons cocoa powder

3/4 teaspoon baking powder

3/4 teaspoon bicarb

1/2 teaspoon salt

1 egg

1/2 cup milk

1/4 cup vegetable oil

1 teaspoon vanilla

1/2 cup boiling water

Nutty syrup:

  • 1/2 cup caster sugar
  • 1/2 cup water
  • 1/2 teaspoon nut extract or flavoring

Hazelnut Praline:

  • 1/4 pound shelled and skinned hazelnuts
  • 1 cup caster sugar
  • 1/4 cup water

Ganache:

  • 1/2 cup whipping cream
  • 1/2 cup milk chocolate chips
  • 1-3/4 to 2-1/4 cups icing sugar

Directions:

1. Preheat oven to 180*C and prepare a 9 inch cake tin

2. To make the cake portion, mix sugar, flour, cocoa, baking powder, baking soda and salt in a large bowl. Add egg, milk, oil and vanilla and beat until well combined.
3. Stir in the boiling water and pour the batter into prepared pan.
4. Bake for 30-35 mins or until a skewer comes out clean.
5. Allow to cool in tin for 10 mins before transferring to a wire rack. Once cooled completely, put it into the freezer until stiff, then slice it in half horizontally.
6. To make the syrup, combine sugar and water in a saucepan, bringing it to the boil until the sugar has dissolved.
7. Simmer for 5 mins, remove from heat, and add extract. Stir, then allow to cool.

8. To make the praline, liberally coat a baking pan with vegetable oil, place the hazelnuts on it in a single layer, and set it aside.
9. Combine the sugar and water in a saucepan over high heat and cook until the mixture turns amber.
10. Immediately pour the syrup over the hazelnuts, let it cool completely, and break it into small pieces. Then put them into ziplock bag and crush with a rolling pin. Transfer them to a food processor and mix until finely ground.

11. To make the frosting, in a saucepan, bring the cream to a simmer and then pour it over the chocolate chips and let it sit for a few minutes. Whisk the mixture until smooth.
12. Place the pan in a bowl of ice water, stirring constantly until cooled. Then gradually beat in the powdered sugar and whip until smooth, thick and fluffy.

13. To assemble everything, brush half of the syrup evenly over one half of the cake. Then spread about a third of the frosting onto the top of that half and sprinkle it with half of the praline.
14. Place the other half of the cake layer on top, brush it with the rest of the syrup, and spread the remaining frosting along the top and sides. Press the remaining praline into the frosting on the sides and sprinkle some on top if you’re feeling fanciful. Chill for a bit before serving.

Tagged , , , , , , , , , , , ,

Sunday Cook Off: Spiced Apple Cake

Spiced perfection

My friend has recently gotten engaged and is busy planning her wedding, centred around the theme of apples and buttons. As a rather excited bridesmaid, I’ve been trying to think of a good cake to make for her (I’m a bit of feeder, cake is what I do), and decided on an apple one. As it was my first time making it, I followed the recipe pretty closely, if I was to make it again I would probably leave the cake in the over for a little longer, as I’m not a fan of squidgy centres. Other than that, delish.

125g butter

225g dark muscovado sugar

2eggs, lightly beaten

225g plain flour

2 tsp baking powder

2 tsp freshly grated nutmeg

1 tsp ground cinnamon

300g cooking apples , peeled, cored and diced

2 tbsp clear honey

2 tbsp unrefined demerara sugar


1. Heat the oven to 160C/fan 140C/gas 3.

2. Cream the butter and muscovado sugar in a food processor for a couple of minutes, then mix in the egg.

3. Sift over the flour, baking powder and spices. Fold together, then stir in the apple.

4. Pour into a buttered, base-lined 20cm springform cake tin and bake for 1 hour, or until risen and browned.

5. Combine the honey and demerara and spread over the cake while still warm.

6. Remove the cake from the tin and serve with cream or ice cream. Keeps for 3-4 days wrapped in foil.

To view the original recipe, and a lot of other tasty conteders visit: http://www.bbcgoodfood.com/recipes/9925/squidgy-spiced-apple-cake

Tagged , , , , , , , , ,

Sunday Cook Off: Italian Hot Chocolate with a Whipped Cream Heart

So. Very. Yummy.

This week I fancied something different but not too time consuming, so I shamelessly plundered this website: http://www.bellalimento.com/2012/01/11/how-to-make-italian-hot-chocolate  My photography skills are not half as good as the previous blogger, but that’s my fault for getting too caught up in the cooking and eating to worry about natural light and all of that bollocks.

As a Mother’s Day treat, I made a dinner of chicken shish kebabs and roasted vegetable couscous, with garlic pitta and houmous on the side. I’ve grown up eating pretty safe foods, roast dinners (which I hate) and lasagne – all brilliantly cooked by my mummy dearest, but not too exciting all the same. So I decided to push the envelope and surprise her, and she always has some sort of diet going on so it would only be fair to make a small, light dessert to go with such a large dinner…ahem. I am most definitely a feeder.

So just in case you can’t be bothered to click on the above link, here’s the recipe for the hot chocolate below:

4 ounces chocolate

1 1/2 cups whole milk

2 tablespoons sugar

2 teaspoons corn starch/4 teaspoons of flour if you can’t find corn starch for love nor money, a la me.

1. Into a saucepan over LOW heat add chocolate and a smidge of milk. Stir with a wooden spoon until melted.

2. Slowly add remaining milk until it’s well combined. Add sugar. Mix to combine. Whisk in corn starch.

3. Continue cooking over LOW heat until it becomes thick, creamy and coats the back of the wooden spoon.

**I ended up making this twice, because the mixture became a lumpy mess after I added the flour, so I tried again sans the white powdery stuff. I’ve kept it in the recipe just in case you have better luck with it. In hindsight, I probably should’ve sifted it, or maybe corn starch reacts differently (my internet sources told me that flour was a good subsitute, and if the internet says it, it must be true).

To make the whipped cream hearts (also taken from the above website), then you do this:
1 pint heavy whipping cream
1 teaspoon pure vanilla extract-as always, I used considerably more
1/4 cup sugar
1. Place cream, vanilla and sugar into your mixing bowl. Using whisk attachment mix until stiff peaks form.

2. Transfer whipped cream to a shallow baking dish. Smooth cream as much as possible. Place dish into freezer until firm.

3. Using a heart cookie cutter, cut out heart shapes.

4. Place hearts into hot chocolate, they’ll melt pretty quickly so don’t fanny about.


And to finish….gobble up every last drop.

Tagged , , , , , , , , , , , , , , ,